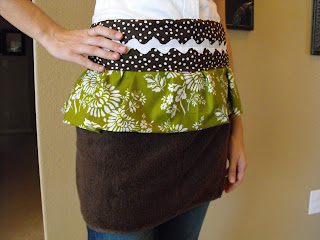
After all the fabulous apron inspiration I was finding on other blogs I was so excited to try my own. I combined a few tutorials that I had found and this is what I came up with......
I was super excited how cute it came out. I still teaching myself to sew so I'm pretty proud of it.
I used two fat quarters and some ribbon I had on hand to make this. Unfortunately I didn't take photos of the process (and even if I did I can't find my camera cord to upload them) but it was actually very easy. Now that I kind of know what I'm doing I could probably do one in a hour or two--and maybe get some photos of it.
Renters No More
After renting a townhouse for 3 years we are so excited to have purchased our first house. Now we get to make it our own and make it truly our first home.
Friday, November 5, 2010
Friday, October 29, 2010
Aprons
I love fun aprons and now that I'm getting into sewing I'm so excited to try to make my own. There are so many great tutorials out there for them. I thought since I haven't tried my own yet I would share some of the ones I love.
This one was featured on Crazy Domestic that was found on A Little of This a Little of That. It's made from a hand towel, what a great idea.
This is from A Feathered Nest, love her fabric choices.
This one is from Sew4Home. I love the style of this one with the waist detail.
This fat quarter apron is from Prudent Baby. Our local craft store has such great prints of fat quarters I could have so many.
Tuesday, September 14, 2010
Where I've been
This past week I made a trip for work to the PSU game in Alabama. It was quite an adventure! We drove, and it is a long drive, it took us two days each way. The weather was super hot and humid but everyone was so nice. I even went into the game for a little.
The best part though about the drive was all the Sonic restaurants along the way. We don't have any near where we live so we made multiple stops on the way for my favorite thing from there Diet Cherry Limeade. I think I had 3-4 during the trip. After doing some research online I found this is super easy to make at home, here is the recipe if you want to try it:
1 cup diet sprite
1/4 cup cherry juice
2-3 lime wedges
mix sprite and cherry juice together over ice, add lime wedges squeezing
each one as you add them
Thursday, August 26, 2010
Quilt
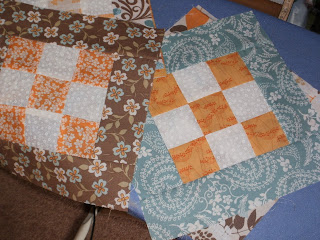
There haven't been many small projects lately because I've been working on one big project...my FIRST QUILT.
I've always wanted to learn how to quilt and decided to just take the plunge. I don't even have much of a background in sewing (I wish I did), I had to take a class in college but haven't really done much since then, so I'm learning a lot. I picked this pattern on Moda Bake Shop but am making it more of a throw size to use when on the sofa. Then I went to the fabric store and picked out a jelly roll of fabric and a white-on-white print to use with it. So far I've gotten 10 of the squares put together.
Saturday, August 21, 2010
Kitchen Valance
We had a ton of work done to our kitchen (see here) when we were moving in, but for some reason I never updated our curtains. I would always look but never found exactly what I wanted so I keep the old ones up. Here is our before with the old curtains, not bad they just didn't work with everything else we put in.
With a flour sack towel from the Dollar Tree I created this.
Here is how I did it
I started with the flour sack towel which is 28x29 inches. The good thing about using this is there is already a hemmed edge so it cuts down on some steps. The fabric on this is a little thin, If I had to do this over I would probably use two towels so I could double it over so it was a little thicker.
The first thing I did was cut it in half so I had two long rectangles
Then I cut one of the rectangles in half again to be my outside pieces.
Next lay out your large rectangle (the piece you didn't cut in half a second time) with the good side facing up, this is the center of your valance. Then lay your two smaller pieces over top to pin in place. You will want these to be good side down with the edge hem at the bottom. Basically you are creating a super long rectangle.
Here are the pieces lined up
Now pin them together so you can sew. I used a half inch seam allowance on mine.
Press the seams open so its nice and flat for the next step.
Now you have to sew a pocket to put it on a curtain rod. I made my pocket by putting a 2 inch fold at the raw edge of the fabric. Pin it in place and you are ready to sew the last part.
I hung mine up before I decided on what to use to gather them. The possibilities you could create are really endless with so many choices of ribbon and fabric out there. I was going to use some ribbon but didn't have any that was thick enough so I ended up using some chocolate brown fabric that I had from a fat quarter. It ended up being the perfect length to fit around. I just have it pinned in place right now because I would like to find some printed fabric with gray, brown and black in it to go with the rest of our kitchen.
Thursday, August 19, 2010
Water in the basement, oh no or oh yeah
Last Thursday I came home over lunch to pick something up and found a mini flood in our basement. We thought it was the furnace but after having the company come out to look at it we've determined it is actually coming from the downstairs shower. That kind of plumbing is beyond Ryan's ability so we are waiting to have someone come look at it.
The way the stall shower is installed we think you have to rip out the whole shower to get to the drain. If that is the case it could turn into a little bit of a remodel, the oh yeah part of getting water in the basement (if only it had damaged the hunter green carpet down there too, but I can dream). We've been wanting to get the floor redone down there since we moved in. Its currently a hunter green faux-marble linoleum, not our taste. So if they have to rip out the shower it may be the perfect time. So in the mist of having a broken shower I'm dreaming of re-doing the room.
Here is the terrible floor now, plus the old owners equally as terrible paint color. See, it's screaming for a re-model. But since its in our basement its been low on our list.
That bathroom is also our laundry room as you can see from the photo above. In this photo you can also check out the amazing washer and dryer Ryan's Mom got us for Christmas last year. I would love to paint the cabinets white, add a neutral floor and a new paint color.
Thursday, August 12, 2010
My laundry sign was a feature
I'm super excited to say my laundry sign was featured on Crazy Domestic today!!! They have lots of other super cute laundry room ideas featured as well.
Subscribe to:
Posts (Atom)