Friday, November 5, 2010

My First Apron!!!!

After all the fabulous apron inspiration I was finding on other blogs I was so excited to try my own. I combined a few tutorials that I had found and this is what I came up with......


I was super excited how cute it came out. I still teaching myself to sew so I'm pretty proud of it.

I used two fat quarters and some ribbon I had on hand to make this. Unfortunately I didn't take photos of the process (and even if I did I can't find my camera cord to upload them) but it was actually very easy. Now that I kind of know what I'm doing I could probably do one in a hour or two--and maybe get some photos of it.


Join  us Saturdays at tatertotsandjello.com for the weekend   wrap    up           party!


HookingupwithHoH


Making

Friday, October 29, 2010

Aprons

I love fun aprons and now that I'm getting into sewing I'm so excited to try to make my own. There are so many great tutorials out there for them. I thought since I haven't tried my own yet I would share some of the ones I love.

This one was featured on Crazy Domestic that was found on A Little of This a Little of That. It's made from a hand towel, what a great idea.


This is from A Feathered Nest, love her fabric choices.


This one is from Sew4Home. I love the style of this one with the waist detail.


This fat quarter apron is from Prudent Baby. Our local craft store has such great prints of fat quarters I could have so many.


Tuesday, September 14, 2010

Where I've been

This past week I made a trip for work to the PSU game in Alabama. It was quite an adventure! We drove, and it is a long drive, it took us two days each way. The weather was super hot and humid but everyone was so nice. I even went into the game for a little.


The best part though about the drive was all the Sonic restaurants along the way. We don't have any near where we live so we made multiple stops on the way for my favorite thing from there Diet Cherry Limeade. I think I had 3-4 during the trip. After doing some research online I found this is super easy to make at home, here is the recipe if you want to try it:
1 cup diet sprite
1/4 cup cherry juice
2-3 lime wedges
mix sprite and cherry juice together over ice, add lime wedges squeezing
each one as you add them


Thursday, August 26, 2010

Quilt

There haven't been many small projects lately because I've been working on one big project...my FIRST QUILT.

I've always wanted to learn how to quilt and decided to just take the plunge. I don't even have much of a background in sewing (I wish I did), I had to take a class in college but haven't really done much since then, so I'm learning a lot. I picked this pattern on Moda Bake Shop but am making it more of a throw size to use when on the sofa. Then I went to the fabric store and picked out a jelly roll of fabric and a white-on-white print to use with it. So far I've gotten 10 of the squares put together.


Saturday, August 21, 2010

Kitchen Valance

We had a ton of work done to our kitchen (see here) when we were moving in, but for some reason I never updated our curtains. I would always look but never found exactly what I wanted so I keep the old ones up. Here is our before with the old curtains, not bad they just didn't work with everything else we put in.


With a flour sack towel from the Dollar Tree I created this.


Here is how I did it

I started with the flour sack towel which is 28x29 inches. The good thing about using this is there is already a hemmed edge so it cuts down on some steps. The fabric on this is a little thin, If I had to do this over I would probably use two towels so I could double it over so it was a little thicker.

The first thing I did was cut it in half so I had two long rectangles


Then I cut one of the rectangles in half again to be my outside pieces.


Next lay out your large rectangle (the piece you didn't cut in half a second time) with the good side facing up, this is the center of your valance. Then lay your two smaller pieces over top to pin in place. You will want these to be good side down with the edge hem at the bottom. Basically you are creating a super long rectangle.

Here are the pieces lined up

Now pin them together so you can sew. I used a half inch seam allowance on mine.

Press the seams open so its nice and flat for the next step.


Now you have to sew a pocket to put it on a curtain rod. I made my pocket by putting a 2 inch fold at the raw edge of the fabric. Pin it in place and you are ready to sew the last part.


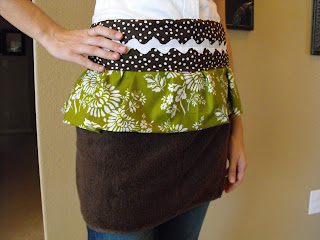
I hung mine up before I decided on what to use to gather them. The possibilities you could create are really endless with so many choices of ribbon and fabric out there. I was going to use some ribbon but didn't have any that was thick enough so I ended up using some chocolate brown fabric that I had from a fat quarter. It ended up being the perfect length to fit around. I just have it pinned in place right now because I would like to find some printed fabric with gray, brown and black in it to go with the rest of our kitchen.


The DIY Show Off


HookingupwithHoH

Thursday, August 19, 2010

Water in the basement, oh no or oh yeah

Last Thursday I came home over lunch to pick something up and found a mini flood in our basement. We thought it was the furnace but after having the company come out to look at it we've determined it is actually coming from the downstairs shower. That kind of plumbing is beyond Ryan's ability so we are waiting to have someone come look at it.

The way the stall shower is installed we think you have to rip out the whole shower to get to the drain. If that is the case it could turn into a little bit of a remodel, the oh yeah part of getting water in the basement (if only it had damaged the hunter green carpet down there too, but I can dream). We've been wanting to get the floor redone down there since we moved in. Its currently a hunter green faux-marble linoleum, not our taste. So if they have to rip out the shower it may be the perfect time. So in the mist of having a broken shower I'm dreaming of re-doing the room.

Here is the terrible floor now, plus the old owners equally as terrible paint color. See, it's screaming for a re-model. But since its in our basement its been low on our list.


That bathroom is also our laundry room as you can see from the photo above. In this photo you can also check out the amazing washer and dryer Ryan's Mom got us for Christmas last year. I would love to paint the cabinets white, add a neutral floor and a new paint color.


Thursday, August 12, 2010

My laundry sign was a feature

CD


I'm super excited to say my laundry sign was featured on Crazy Domestic today!!! They have lots of other super cute laundry room ideas featured as well.

Wednesday, August 11, 2010

Chicken Enchiladas

This Sunday I made a super easy dish that tastes great and makes a ton of food...chicken enchiladas. I even have some in the freezer for another meal and we've had them two night for dinner. Here is how I make mine:

Ingredients
Cooked, shredded chicken (I poached mine in water for about 40 minutes but they were large pieces)
Sauteed onion (I did mine with some garlic and cumin)
Salsa
Fat free refried beans
tortilla shells
Enchilada sauce
Cheese
Sour cream to top them

Once I shredded the chicken I mixed in my onions and added a spoonful or two of salsa so that it wouldn't dry out when baking. Then I got my ingredients set up to assemble.


I spread a layer of refried beans on a tortilla and add a scoop of the chicken mixture.

Then I rolled it up. I fold in the top and bottom then roll. Place it seam side down in a baking dish. Here are mine all ready for the sauce.

I didn't pour it on since I wasn't going to bake them right away. At dinner time I just had to pour on the sauce and add a little cheese. I baked mine at 350 for about 40 minutes, until they were hot inside and the cheese melted. They are also great as leftovers.

Sunday, August 8, 2010

We now have a wall


After calling in a contractor to give an estimate on our wall project what they wanted to charge just wasn't in our budget right now. The whole reason we decided to build the wall ourselves was to keep it a low cost project. Thankfully we have some wonderful family who helped us out. Ryan's Uncle actually does hardscaping for a living in New Jersey so he made a trip to help us get our wall completed. At about 10:30pm last Friday night Ryan's mom called us to say he would be here the next morning around 11am to start working. I still can't believe he drove all the way here to work for a day. His results are amazing and we couldn't thank him enough.

Here are the guys getting to work


The first row is on

Its starting to get dark and they are still working.
Thank goodness we have a motion light on the side of the house that points toward the wall so they could keep going.

Ryan working on the back-fill today to finish it up. Our next step is to add a
flower bed behind the wall. The actual planting may wait until next spring because the plant selection is pretty picked over right now.


Tuesday, August 3, 2010

Making our laundry a little cuter

A few months ago we purchases one of those hampers that has four separate bags so you can sort your laundry as you put it in the hamper. If you have the space its definitely worth the money. Its so easy to just grab the bag and bring it down to the laundry room and just dump it in. On laundry day our basement isn't taken over by piles of sorted clothing. I decided it needed a little something so I added this sign to our hamper


To make this cute plaque I purchased a plaque from the Dollar Tree, I think it had a monkey or something on it, but the edges were finished nicely in cream. I used Modge Podge to cover it in a brown paper then applied the letters with vinyl. I used some extra twine I had from my decor balls to attach it to the hamper.


Show and Tell Green

Thursday, July 29, 2010

Personalized Kitchen Plate


This is our newest accessory in our kitchen and it cost me under a dollar! I used a Dollar Tree plate, that I found on clearance there for 50 cents and added some vinyl. I cut the W design using my Make the Cut software for my Cricut. I have two more of these sale plates left, I can't wait to come up with some designs for them.

Sunday, July 25, 2010

Yum! Home Grown Tomatoes

Our first tomato from our tomato plant!!!
(accompanied by Spider Man)

Sometimes you just have to call in the professionals

Ryan and I aren't afraid to try projects around the house ourselves, but we do know our limits of what we can do. We thought two small retaining walls would be a project we could easily handle ourselves. At the end of our driveway we had a lot of railroad ties that needed to come out. They are a great attraction for termites, other bugs and rodents so they needed to go. The second wall is on the other side of the garage, made of railroad ties as well (that set is home to a chipmunk that has it out for Ryan).

To prepare we went to Home Depot and picked out our blocks and caps and all our necessary supplies. We choose a gray color with cut edges to match the stone on the outside of the house. Saturday morning we got up early to get to work. After about 6 hours this is what the wall looked like.


A professional is coming by the house tonight to give us an estimate. Hopefully they can fix what we've done and use our supplies.


Sunday, July 11, 2010

50 Cent Yard Sale Art

For a total of 50 cents and about a half hour on a Saturday afternoon I took some yard sale frames and made this cute button art for our family room

Here is what I started with, not my taste but the frames were great. Painted and distressed already (and only 25 cents each) I bought them without knowing what I would make, but knew I could think of something.
When I got the frames home I was first thinking I would use my Cricut and some vinyl on the glass to create some signs but decided that wasn't quite what I wanted. For this project I did limit myself to only the supplies I had on hand to make it a super cheap project. When looking through the supplies is the craft closet I found some buttons and white muslin and inspiration struck.

I used the photos from the frames and just wrapped them in the white muslin using shipping tape on the back (no one sees the back so I wasn't concerned about making it pretty)

Then I popped them back into the frames. I used a ruler and created a grid for where I should put my buttons.

I could have sewn them, but I took the short-cut way and used hot glue. It is a 1/2 hour project after all. These frames are thick enough that they are able to stand up on their own, so they can either go on a table or the wall. We placed them on top of our entertainment center. Here is the finished product again.


Join  us Saturdays at tatertotsandjello.com for the weekend wrap up       party!